고정 헤더 영역
상세 컨텐츠
본문
Table of Contents. Steps to Configure Zoho Mail account as IMAP in Outlook. Log in to your account to. (Login to www.zoho.com/mail Settings Mail Accounts IMAP Access Enable IMAP Access by clicking the checkbox). Launch the Microsoft Outlook application in your system. Go to the Tools menu, and select the Accounts option. Select the Other Email option.
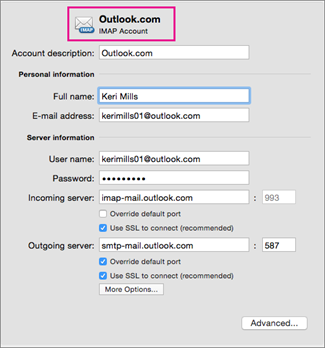
Enter the below details in the Account Information page:. Enter your Zoho email address (user@domain.com or email aliases for organization accounts or username@zoho.com, if you have a personal account) in the E-mail Address field.
Enter your Zoho account password in the Password field. Username: Your Zoho account email address (user@domain.com or email aliases for organization accounts or username@zoho.com, if you have a personal account).
Type: Select IMAP from the dropdown list. Incoming server: imappro.zoho.com - for organization accounts (if your domain is hosted with Zoho). Incoming Server: imap.zoho.com - for personal accounts (if you have a personal @zoho.com account). Select the Use SSL to connect checkbox. Outgoing Server: smtp.zoho.com. Select the Override default port and Use SSL to connect checkboxes. The Port Number field next to Outgoing server will be enabled now.
Set the Port Number to 465. Click Add Account.

After the account details are validated, the details will be displayed in the Accounts tab. Close the Accounts tab, and you will be able to access your Zoho Mail account on Outlook for Mac. Specific Instructions for Outlook IMAP Sent Items By default, our SMTP Servers automatically place sent emails in the Sent folder. However, when you send an email with Outlook, it also saves another copy in your Sent folder there. To avoid duplicates in the Sent folder, change the following settings: In Zoho Mail: You can turn off the copy created by the server in the SMTP settings. Refer for instructions.
However, you can also change the settings in your Outlook application. In Outlook:. From the Tools menu, select the Accounts option. Select your Zoho Mail account from the accounts listed, and click Advanced.
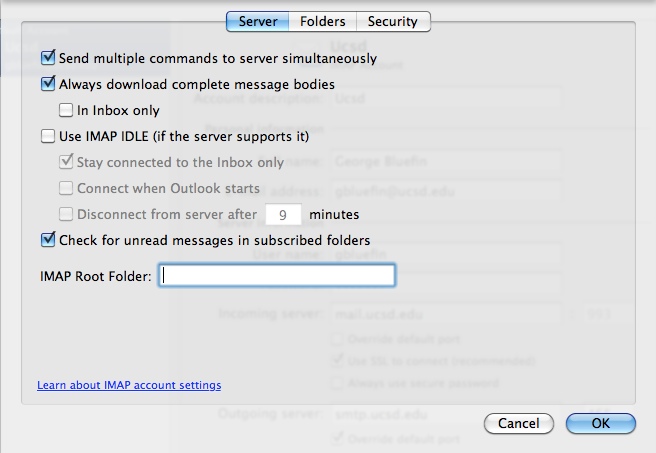
In the Folders tab, select the Don't store a copy of sent messages checkbox. Downloading full messages By default, Outlook downloads just the Sender, Subject, and the Date Information (headers) when syncing email. It downloads the full message only when you click on that email. You can change this behavior by changing the Send/ Receive Settings. From the Tools menu, select the Accounts option.
Select your Zoho Mail account from the accounts listed, and click Advanced. In the Server tab, uncheck the Download Headers only option.

What Is An Imap Account In Outlook
Related stories. to its free Web e-mail service, Outlook.com. Using IMAP is preferable to POP, because it offers a way to keep your e-mail synchronized when using third-party clients. You can use Outlook.com with Apple's Mail app on OS X, but its new account wizard is preconfigured to use POP whenever you enter 'outlook.com' as your e-mail address. Here's how to set up Mail to use IMAP for Outlook.com instead of POP, so you can take advantage of the new IMAP support. Step 1: If you're using two-step verification with your Microsoft account, you need to go to and create an app password to use.
If you're not using two-step verification, move on to Step 2. Step 2: Launch the Mail app in OS X and start the add account wizard by going to File Add Account. If you've never used Mail and you're opening it for the first time, the add account wizard will appear automatically.
How To Configure An Imap Account In Outlook 2011 For Mac
Step 3: In the address field, enter a bogus e-mail address and leave the password field blank, then click Continue. Screenshot by Ed Rhee/CNET Step 4: For incoming mail server settings, make sure that the account type is set to IMAP, then enter 'imap-mail.outlook.com' as your incoming mail server. Enter your real Outlook.com e-mail address and password in the username and password fields.
Remember to use your app password here if you're using two-step verification. Click Continue to move on to the outgoing mail server settings. Screenshot by Ed Rhee/CNET Step 5: Under outgoing mail server, enter 'smtp-mail.outlook.com.' Check the box to use authentication, then click Continue. Screenshot by Ed Rhee/CNET Step 6: At the account summary page, double-check the mail server settings to make sure that everything has been entered correctly.
You'll notice that your e-mail address shows up as the bogus address you entered in Step 2. We'll go back and fix this after the account's been created. Make sure to uncheck the box next to 'Take account online,' then click Create. Screenshot by Ed Rhee/CNET Step 7: When the Accounts window appears, select the account you just created from the left pane. When your account information appears, replace the bogus e-mail address with your real Outlook.com e-mail address.
When you're all done, close the Accounts window and make sure to save your changes. Screenshot by Ed Rhee/CNET.


